
Upholstery foam can create an excellent extra layer of padding to your furniture, but only if it stays in place. If it moves around, before too long you’ll be right back to where you were before you started.
One obvious way to keep upholstery foam in place is to glue it there. Metal fasteners — tacks and fabric tacks — are likely to result in tears over time. The questions are what glue to use and how to use it.
We took a look at the topic and put it all in this article. By the end of it, hopefully you’ve got some ideas for how to tackle this project on your own without paying a professional. We hope you find it of value.
In This Article We'll Discuss
How to glue upholstery foam to wood
The first thing that you’ll want to know is that wood furniture frames are usually pretty smooth, whereas upholstery foam is pretty porous. You’ll want to correct the first while taking the second into account before you start gluing.
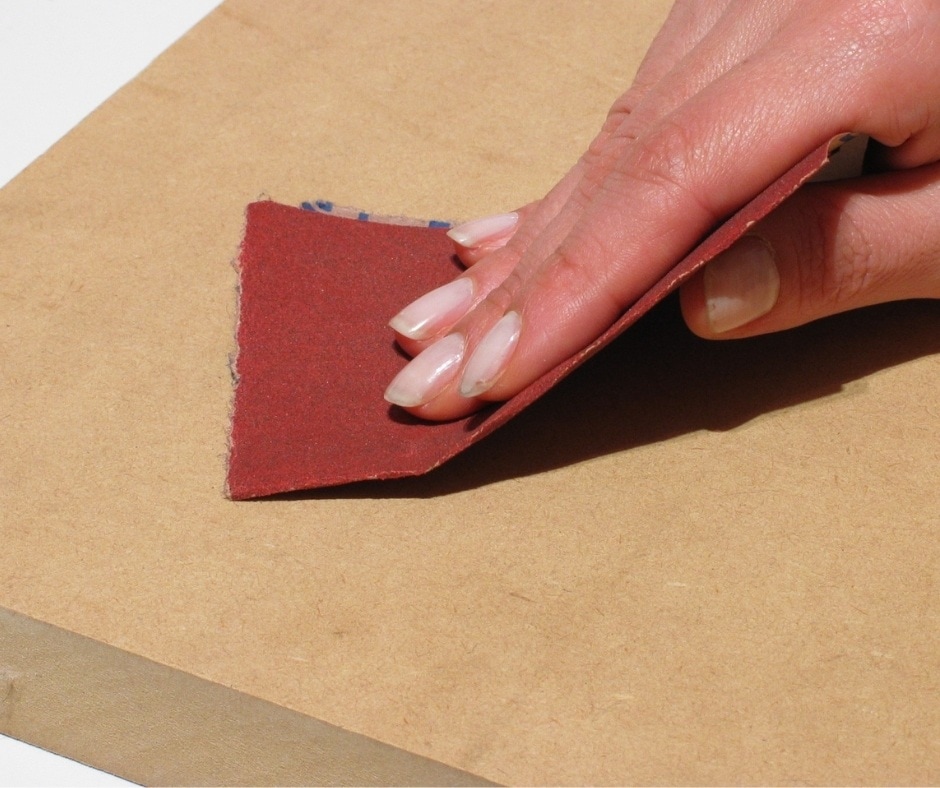
Take an 80-grit piece of sandpaper and rough the areas of the furniture frame you want to glue the foam to to roughen it up. This will create more surface space for the cement to sink into, which will create a tighter bond between the wood and foam.
The best glue to us is polyurethane construction glue. Other kinds of glues can either get absorbed into the foam or even melt it. Polyurethane construction glue is specially designed to bind foam to things.
Paint the glue onto the foam that will connect to your furniture frame. Allow it to sit for a few minutes so that it’s pretty sticky when you press it down on the wood.
Carefully press the foam into place, shaping it to conform to your furniture frame. You want as tight a fit as possible. If you have clamps that you can position into place, you’ll want to use those.
Allow it to completely set for between six and eight hours. Letting it dry overnight is a good rule of thumb, too.
How do you bind foam to wood?
Because upholstery fabric is frequently fastened to a wood frame with nails or staples, you might think that these offer the best ways to also bind foam to wood. That would be incorrect.
Over time, as people sit on the furniture and get up, that movement will shift the foam around. Nails and staples used to hold the foam in place will stay in place, and the conflict will lead to tears in the foam.
The best way to bind foam to wood is to glue the two together.
Depending on the kind of project you’re doing, you can either use a simple glue gun if you don’t need a durable bind. If you need something that will last a while, we’d suggest polyurethane construction glue.
Start by sanding the wood for a little bit. You want the surface a little bit rough to create more space for the adhesive to sink into. This will lead to a tighter bond between the foam and the wood.
Apply adhesive to both the foam and the wood in a nice even layer. Allow it to dry for a few seconds, during which the glue will become even stickier.
Lay the foam down on top of the wood and hold it in place for several seconds. If you have clamps that will work for your particular project, those are perfect to hold everything in place until the glue fully dries. That should take between six to eight hours.
What is the best glue for upholstery foam?

Not just any glue is suitable for use when bonding upholstery foam to wood. The foam’s porous nature means that it can absorb some glues without adhering to surfaces, and some glues can melt delicate foam.
The best overall glue for upholstery foam is polyurethane construction glue. It has the toughness to stick foam to wood while also offering some flexibility so that seams won’t get rigid and create tears.
You can also find some glues designed specifically for foam projects, and some spray adhesives will work well, too.
One thing to keep in mind is that there isn’t just one kind of foam. There are a couple of different kinds. We’d recommend that when buying your foam that you ask the salesperson which glue works best.
They might have a specific brand or kind of glue to use. If they don’t, get yourself a polyurethane construction glue or a more modestly priced alternative.
Can wood glue be used on foam?
Foam and wood require special consideration when you want to glue them together. Things that work on hard, smooth wood have difficulty binding soft, porous foam.
Wood glue is an option because it works on wood. If you use enough of it, it’ll also work on foam.
However, one caveat is that wood glue creates a fairly brittle bond between wood and foam. That will work well for something like insulating foam and a wood house frame, but for furniture, you want something that is going to be a little more flexible.
How long does wood glue take to dry on Foam?
Wood glue is going to dry on foam the same amount of time as it will take to dry on anything, and it’s not a hard number. Dry times are influenced by humidity in the air, temperature, and the amount of glue used. It also depends on how much air can get to the joint.
It is also heavily influenced by the kind of wood glue used. A wood glue designed for fast drying will naturally dry a lot more quickly, but the bond may not be as strong.
For the most part, however, wood glue shouldn’t take longer than several hours to completely dry. If you’re connecting upholstery foam to wood, we’d suggest letting it for six to eight hours to complete the job. If you can use clamps, so much the better.
Conclusion
Using glue to bond upholstery foam to wood is the best way to bond the two, but you’ll want to know the right kind of glue to use. At best, it can get absorbed by porous foam and won’t adhere. Ar worst, it can melt the foam.
A good, solid polyurethane construction glue is the best way to go. But you can also use spray adhesives and even common wood glue. A lot of your choice depends on how strong a bond your really need.
We hope you found this article of value. If you did, or if you have suggestions for how to bond wood and upholstery foam, feel free to leave a comment down below. Or share this article on your social media networks.